
Are you looking to give your car audio system a boost? Installing a car amplifier can help you achieve the high-quality sound that you crave. While it may seem like an easy task, there are several common installation mistakes that could ruin your experience and even damage your vehicle. In this blog post, we will guide you through the process of installing a car amplifier and provide valuable tips to avoid these mistakes. Whether you’re a DIY enthusiast or just getting started with car audio upgrades, keep reading for essential information on how to install a car amplifier correctly.
Is it easy to install a car amplifier?
Installing a car amplifier can seem intimidating, especially if you’re new to the world of car audio. However, with the right tools and guidance, it is possible to install a car amplifier yourself.
One of the most important things to keep in mind when installing a car amplifier is that it requires careful planning and attention to detail. You need to ensure that your wiring is correctly connected, grounded, and protected from potential damage.
👉 Exploring Different Amplifier Configurations. Mono vs. Multi-Channel Amplifiers
Another factor that can make installation challenging is finding the best location for your amplifier. Depending on your vehicle’s layout and space constraints, you may need to get creative with where you mount your amp.
However, don’t let these challenges discourage you! Many people have successfully installed their own amplifiers by following online guides or seeking advice from experienced professionals.
While there are some hurdles involved in installing a car amplifier yourself, it’s definitely achievable with patience and dedication. Just be sure to do plenty of research beforehand and take all necessary safety precautions during installation.
How to install a car amplifier?
If you’re looking for more powerful sound from your car’s audio system, installing a car amplifier is one of the best ways to achieve it. However, installing an amplifier in your car can be overwhelming if you don’t know where to start. Here are some simple steps that will guide you on how to install a car amplifier.
Firstly, gather all the necessary tools and equipment that will help make the installation process easier. These may include wire cutters, crimpers, electrical tape, mounting screws, and screwdrivers.
Next step is to disconnect the negative battery terminal cable before starting any work on your vehicle’s electrical system. This important safety measure ensures that there won’t be any accidental short-circuits or injuries during the installation process.
After disconnecting the negative battery terminal cable, locate a suitable spot under your car seats where you want to mount your amplifiers. You can choose either trunk or backseat depending on which area has more space.
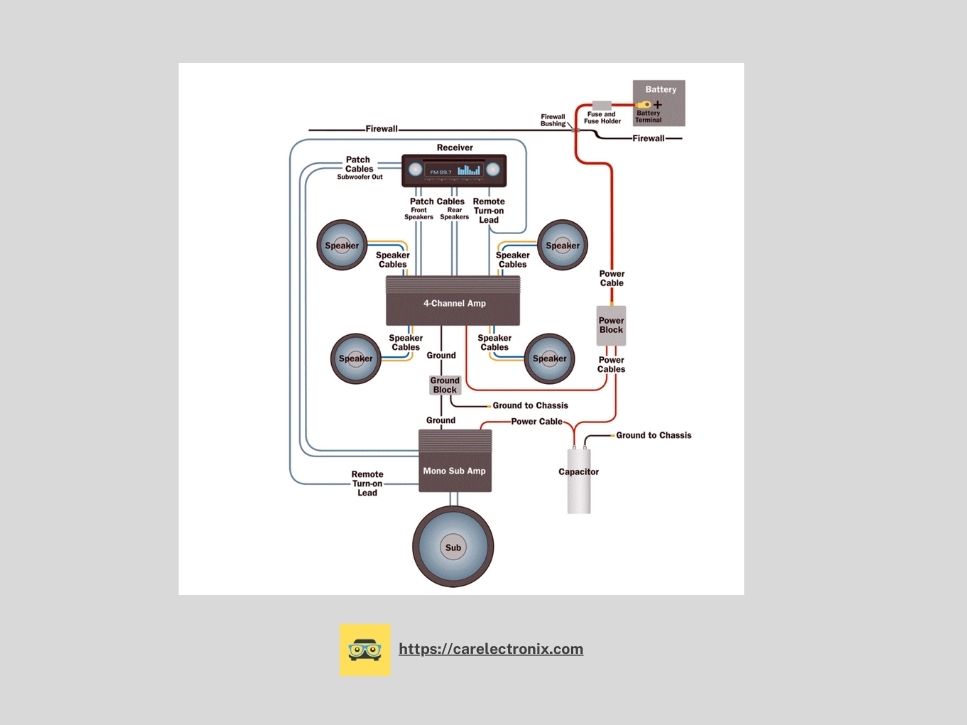
Then run RCA cables from head unit output jacks located at back of head unit into amplifiers input jack; run power wires (8-10 gauge) from positive side of battery through firewall grommet area along with ground wires (same size) connected securely onto chassis ground point near amp location
Finally connect speaker wires coming out of each channel output terminals on new amps or old factory radio crossovers as needed onto speakers themselves using crimp connectors while also being sure not mix up left/right channels accidentally
Main steps for installing car amps
-
Disconnect Battery. Disconnecting the car battery is an essential safety measure to prevent electrical shorts and shocks during the installation process.
-
Mount the Amp. Choosing a suitable location to mount the amplifier is crucial for heat dissipation and minimizing interference. Adequate space for wiring and controls should be ensured.
-
Install the Power Wire. Routing the power wire from the car battery, through the firewall, and to the amplifier is necessary for supplying power to the amplifier.
-
Install the Fuse Holder. Installing a fuse holder close to the car battery provides protection against excessive current flow and potential damage to the amplifier.
-
Connect the Power Wire. Properly connecting the power wire to the positive battery terminal ensures a secure power supply to the amplifier.
-
Install the Ground Wire. Establishing a solid ground connection between the amplifier and the car’s metal frame is essential for proper amplifier operation and preventing potential issues.
-
Plug in RCA, Speaker, and Remote Turn-On Leads. Connecting the RCA cables, speaker wires, and remote turn-on leads ensures the audio signal and control signals are properly transmitted between the amplifier and the head unit.
-
Turn It On. Testing the amplifier’s functionality by gradually adjusting the settings and ensuring proper sound output from each speaker helps verify a successful installation.
Fuse Importance in Car Amplifier Installation
The in-line fuse on the main power cable, close to the battery connection, is crucial as it safeguards against short circuits that could potentially cause fires.
Table: Fuse Recommendations for Different Gauge Wiring
| Gauge Wiring | Recommended Fuse Rating |
|---|---|
| 10-gauge | 25-amp fuse |
| 8-gauge | 60-amp fuse |
| 4-gauge | 100-amp fuse |
| 1/0-gauge | 250-amp fuse |
These fuse ratings are appropriate for a typical 16 to 20-foot fuse run, ensuring adequate protection for your car amplifier installation.
DIY installation tips for car amplifiers
By following these DIY installation tips for car amplifiers, you can avoid making common mistakes and ensure that your amplifier is installed correctly:
-
Read the manual: Before starting the installation process, read the manual carefully to understand all the instructions.
-
Choose a suitable location: Make sure to choose a suitable location for your amplifier where it won’t get damaged by heat or moisture.
-
Use appropriate wiring: Always use appropriate wiring according to your amp’s power requirements and make sure they are properly grounded.
-
Test before completing the installation: Once you have installed everything, test it thoroughly before completing the setup.
-
Seek professional help if needed: If you’re struggling with any part of the installation process or don’t feel confident in your abilities, seek professional assistance from an experienced installer.
👉 Choosing the Right Wiring Kit for Your Car Amplifier Installation
Installing a car amplifier doesn’t have to be complicated or overwhelming as long as you follow these simple DIY tips and take precautions throughout each step of the process. By doing so, you’ll enjoy high-quality sound without worrying about damaging your vehicle or equipment!


